Nails: Tools & Equipment Part 1

Doing gel manis at home can be a fun and creative escape all while working on your nail skills. But keep in mind you’ll have to invest in the tools and equipment to get the job done. Sadly, we can’t snap our fingers and instantly have our nails polished.
*Siiiighhh* If only…
I’ll be doing this Tools & Equipment series in 2 parts because it’s information overload to do all in 1 post. Let’s start with the most common FAQ’s I get relating to doing gel manis at home:
- What’s a good LED/UV Light?
- Do you need really need an E-File?
LED/UV light
This is absolutely not negotiable, but how much you spend is up to you. An LED or UV light is necessary to be able to cure the polish itself (base and top coats included). I hate to break it to you, but gel polish does not dry without curing. You’ll be 100 years old with a head full of white hair before that polish dries. Even then, it’s not going to happen.
You can use either an LED or a UV light, both will get the job done (unless the polish is specific to one). LED’s just get them done quicker. The rule of thumb is: 30 seconds in LED or 2 minutes in UV (unless otherwise stated). Just because a UV light may take longer to cure, doesn’t mean it’s less than in quality.
When I first started doing nails as a career, I only used a UV light for my gel polish. Mainly because I did a lot of UV gel before gel polish was born and it was all-the-rage. I quickly transitioned from doing UV gel to (almost) full time doing gel polish. Time is money and LED allowed me to work faster, so LED it was and I started using that for my gel polish applications. Nowadays there are lights available that have both bulbs (UV and LED) in the same lamp. How convenient that would have been in my earlier days! Oh technology, you are great.
Currently, I use Artistic Color Gloss PRO30 LED. This is the one you’ll see in my nail tutorials. I’ve had this lamp for yeaaaars and I purchased it through a supplier for licensed professionals. It still works fantastic! This brand now has a new(er) light called the Artistic LED Cure Box and it looks so good it gives me butterflies.
I’ve also used Gelish 18G Unplugged LED light and it, too, is wonderful. There are lots of Gelish Kits on Amazon that come with a mixture of; base, top, pH bond (in some kits), and a variety of polish.
You can also check out Sally Beauty and Premier Nail Source to search more lights. I can only speak for the lights I’ve used personally so be sure to do your research on all the options out there. Compare prices, read the product descriptions, check out the reviews, and submit questions to the site if you have additional questions. There’s lots of choices out there and you want to make sure you’re getting one that fits your needs and budget.
E-File & Bits
An e-file is not absolutely necessary to achieve a successful set of nails, but it sure does make things much easier and faster. Does it take some learning and getting used to? You bet your ass. It took me awhile to fully get comfortable using an E-file and that only came from repetition. I’m talking lots of practise. Like, a lot of practise.
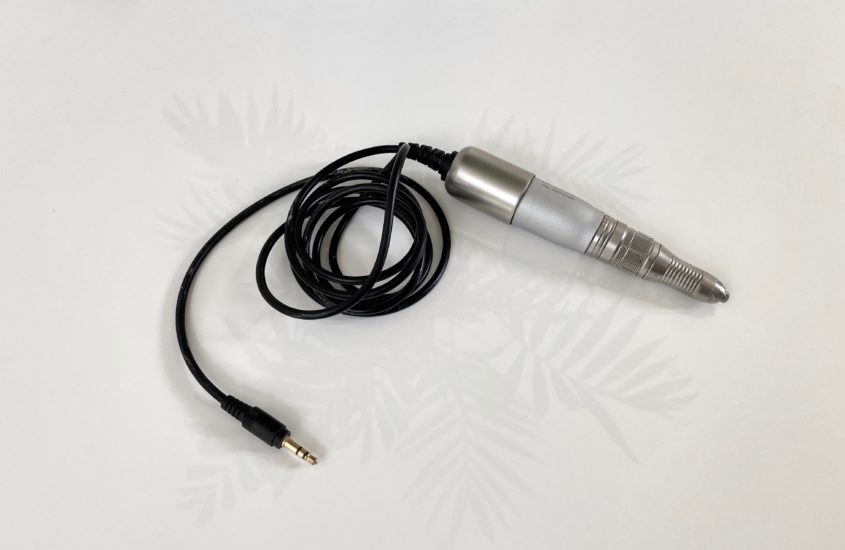
I have a Medicool Pro Power 520 Electric File (seen in my nail tutorials) that I’ve had for years. You can check out some more Medicool options and pricing here. Some E-Files come with a Bit Kit and some don’t, so be sure to read everything thoroughly. Other brands to check out (these are $250+): Gelish Go File and The Gel Bottle Pro E-File.
If you decide to invest in an E-File, the two bits to have would be:
Mandrel Bit– Used to put the sanding bands on. The sanding bands are used to remove/buff nail product. In addition to the Mandrel Bit, you will also need sanding bands. I have sanding bands in fine (to buff) and medium (to remove product).
The Mandrel Bit is typically a universal size and should fit most E-files regardless of the brand. Always read product description to double check.
Cuticle Bit– Used to push back cuticles and remove debris/oil from the nail plate during the prep process. There are a variety of bits you can use for the cuticles, it all comes down to preference and what you feel comfortable using. I bounce back and forth between cone and needle. Other examples are; tapered, oval, flame, diamond, football, needle, just to name a few.
Below are some sets I found on Amazon, but as always do your research before purchasing.
If you are not investing in an E-File you will need to be twice as thorough and spend twice as much time prepping the nail by hand. This includes pushing back cuticles with a cuticle pusher, trimming the cuticles with a nipper or lightly brushing/buffing them off, and removing dead skin, oil, and debris from the side walls with a cuticle pusher/acetone.
I do not recommend soaking the nails in water to soften the cuticles prior to application because the moisture can effect the product application. Believe it or not, our nails absorb water and water is not friends with gel polish. A dry manicure and prep is preferred for optimal results.
In part 2 of the Tools & Equipment series I will cover tools (cuticle pushers, nippers, orange wood sticks, etc) acetone, alcohol, nail polish remover, gauze/lint-free wipes, polish brands, cuticle oil, and everything else I use to be able to do my own nails at home.
Until then, this post has a lot of info for you to marinade on. As always, leave me your questions and/or comments below!
Stay tuned for Part 2 coming soon.


Marly
Chia! In your next post are you going to also touch base on poly gel nails??
chia
Hi there!
My next post will be about tools and all the other things I use to be able to do a gel mani from home! I’ve dabbled in poly gel a couple times, though!
Thanks for reading Marly =)
-Chia
Tiffany
I used an efile and completely filed my nail down wayyyyy tooooo much. Literally terrified to use one again, but it’s so much faster like you said. I’m just gonna have to continue practicing! Lovely post. Can’t wait for the others.
chia
Tiffany,
Thanks for your message! I know this feeling all too well. I’ve been there several times over, but you will get better! Practise, practise, practise. You got this!
-Chia
Vee
Lol so glad I read this post. During the quarantine I went out to get an efile n I’ve definitely been using the wrong drill bit for the sanding bands😅. I’ve been using a tiny piece of paper towel to make it fit on the drill bit😂.
chia
Hi Vee,
Thanks for your message. Look, we just trying to make do with what we got during these times! But yes, sanding bits will def come in handy and be more effective than paper towel.
Keep me posted if you make the transition to sanding bits!
-Chia
Adriana
Hi Chia! I never knew you could use a medium sanding bands to remove product!? That actually sounds a lot more safe to use as a beginner. How does it compare to a carbide bit? I thought medium sanding bands were actually better to prep the nail than fine bands. I accidentally bought fine instead of medium, so I’m glad to know fine sanding bands is good for nail prep.
chia
Adriana,
Thanks for your message. I’ve actually never used carbide bits. My equipment came with the Mandrel Bit + sanding bands so that’s just what I’ve been using. I know a lot of people who use carbide bits, so it really just comes down you and what you’d like to use! There’s no wrong answer here.
It all depends what stage you’re at in the removal process. If you are removing product you can use a medium bit, but if all product is off you can switch to a fine sanding bit or a 100/180 buffer. This will be much more gentle and avoid damage the natural nail.
I hope this helps explain things a little more.
-Chia
Z
Yaaay this was so helpful! 😀
chia
I’m so glad!
Thanks for stopping by =)
-Chia
Gena
I just decided to get back into doing my nails regularly (what the hell else am I going to do now, right??), and I want to start doing gel manicures. I just knew that you would have some great advice! Thank you so much for this. I just ordered some stuff the other day, and it looks like I’m on the right track. I hope I don’t completely destroy my nails. Have you ever used one of those little steamer things to remove your gel? I bought one, and I’ve seen people have mixed results with them. I’m both excited and scared to try it out.
chia
Gena!
Thank you for coming to me for nail tips. I’m excited you ordered some things and are hopping back on the nail train =). I’ve never used a steamer to remove my gel. I’ve seen the results go both ways, but I guess you don’t know until you try.
You’ll have to keep me posted! WOO
-Chia
Gena
Back to report that I LOVE GEL MANICURES!!! I’ve only had to do 2 manis since I posted before, and that is life-changing. What a low-maintenance time saver.
So that steamer thing?? Worthless lol. What a waste of money. I did, like, 3 cycles, and it only removed about half the polish. That’s going in the trash!
Thank you for all the great tips you post here! You are such a sweetheart and a big help. ❤️